1.Scrapy框架的概念与执行流程
学习Scrapy的原因
Scrapy不能解决剩下的10%的爬虫需求- 能够让开发过程方便、快速
Scrapy框架能够让我们的爬虫效率更高
什么是Scrapy
文档地址:
Scrapy使用了Twisted['twɪstɪd]异步网络框架,可以加快我们的下载速度。
Scrapy是一个为了爬取网站数据,提取结构性数据而编写的应用框架,我们只需要实现少量的代码,就能够快速的抓取。
异步与非阻塞的区别
前面我们说Twisted是一个异步的网络框架,经常我们也听到一个词语叫做非阻塞,那么他们有什么区别呢?
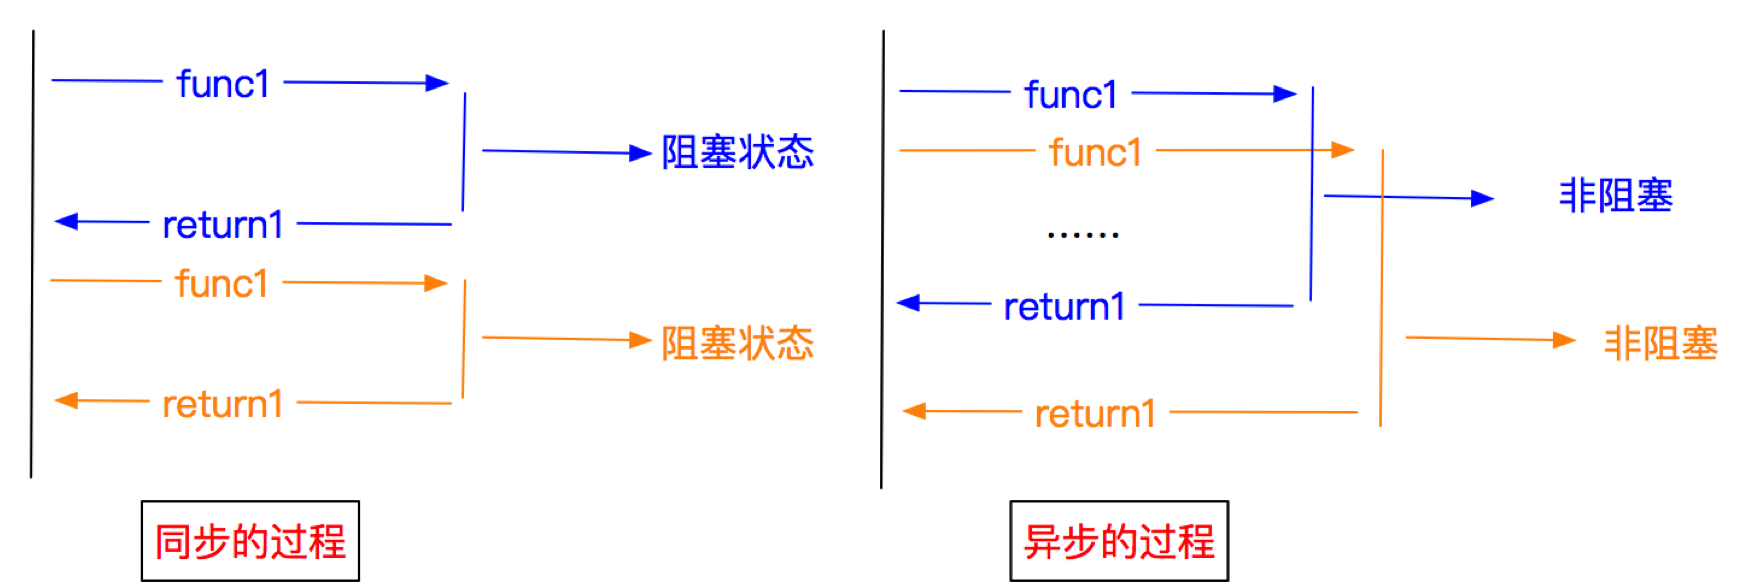
异步:调用在发出之后,这个调用就直接返回,不管有无结果;异步是过程。
非阻塞:关注的是程序在等待调用结果(消息,返回值)时的状态,指在不能立刻得到结果之前,该调用不会阻塞当前线程。
Scrapy的工作流程
之前爬虫的工作流程:
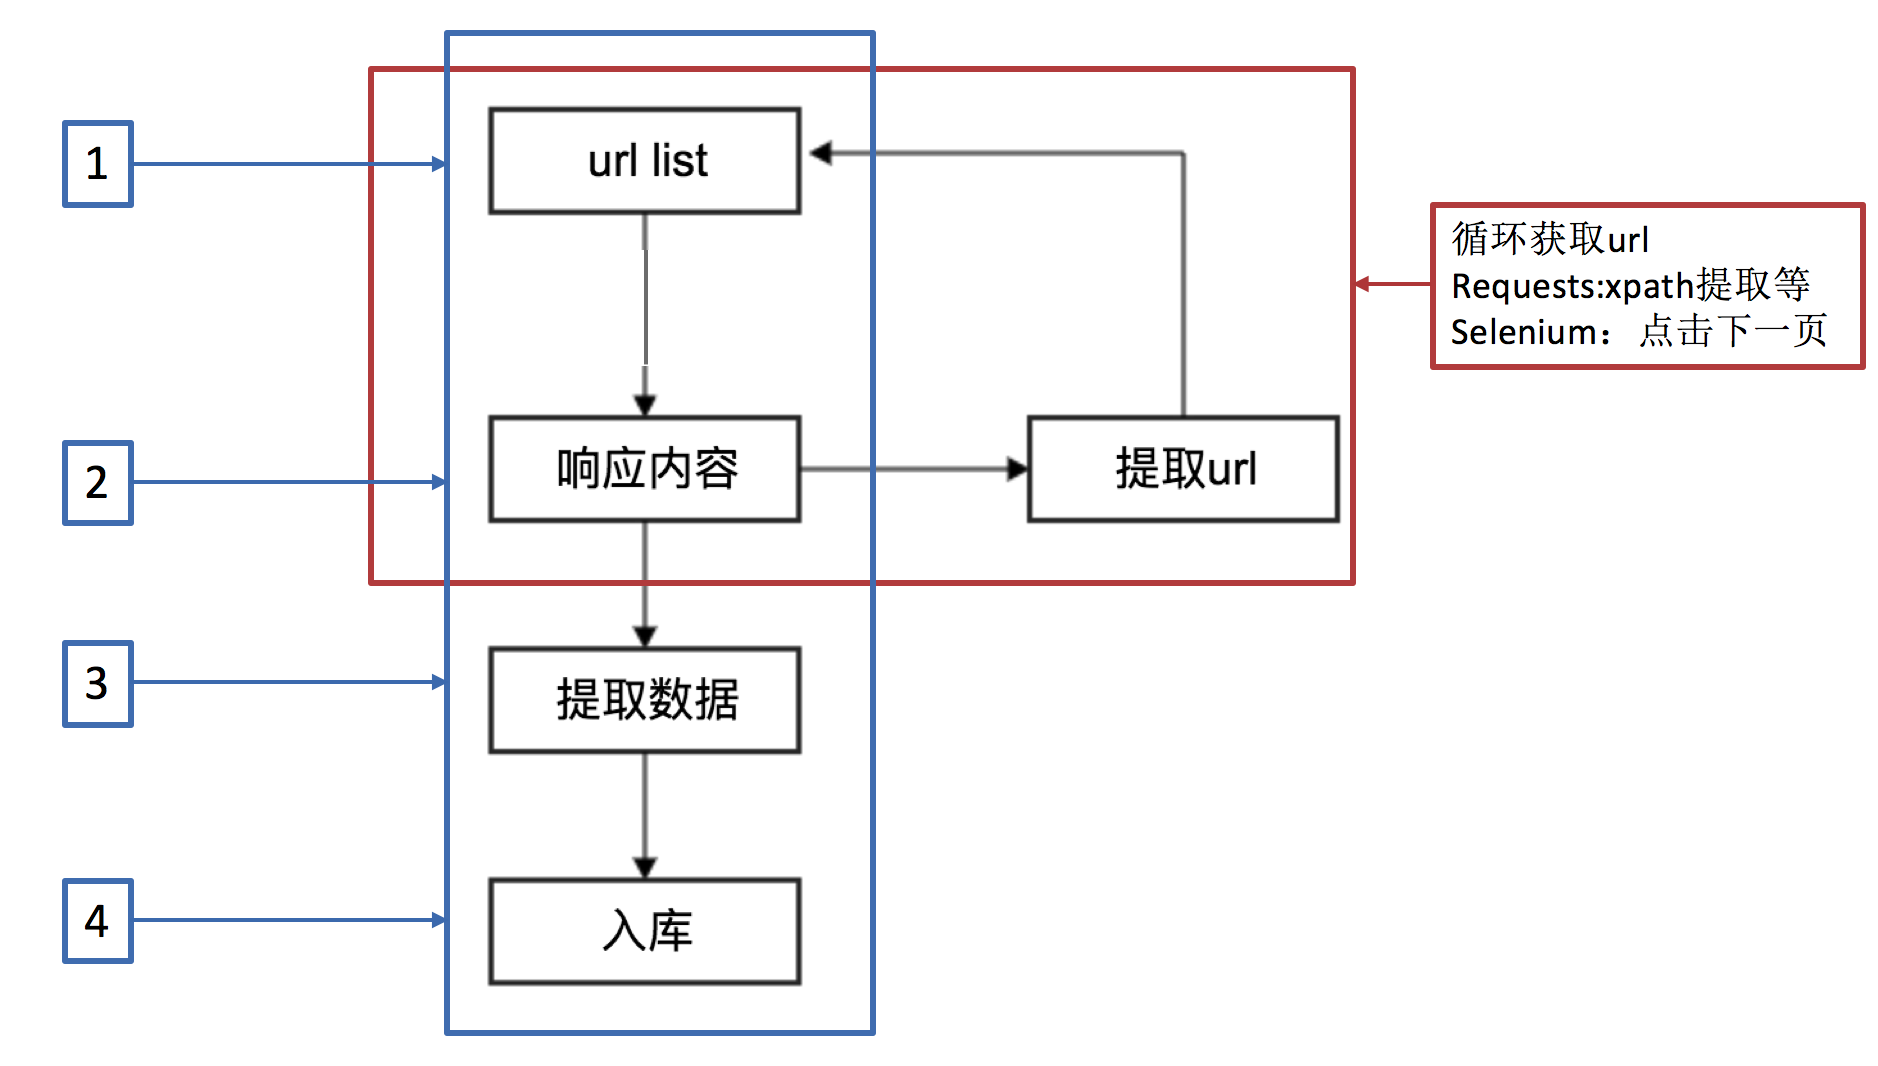
上面的流程可以改写成以下结构:
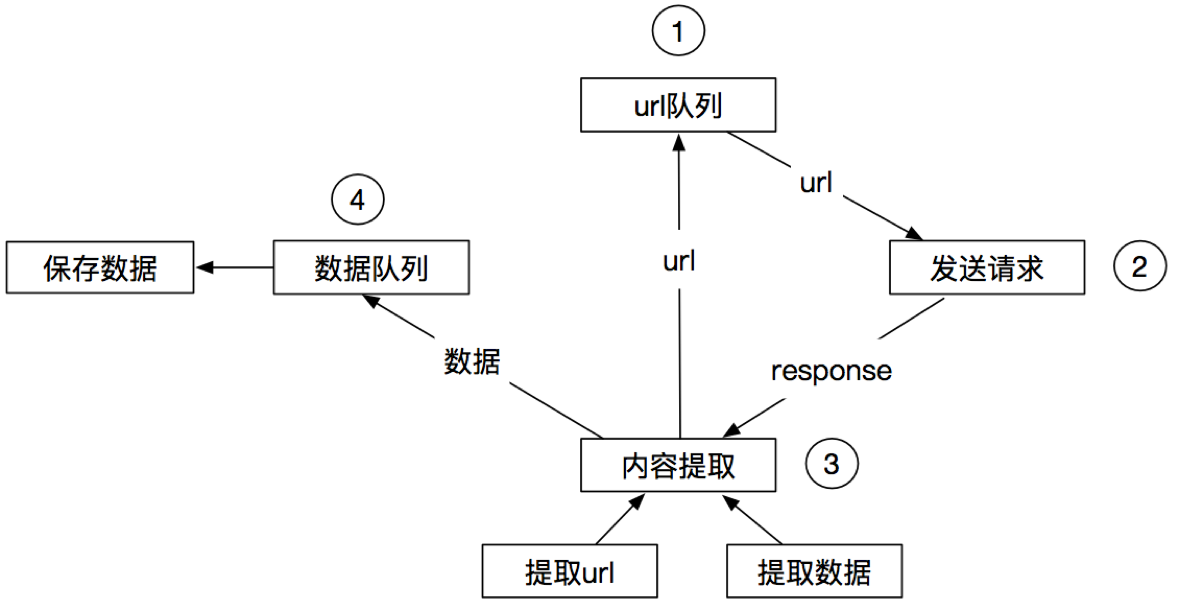
Scrapy框架的执行流程:
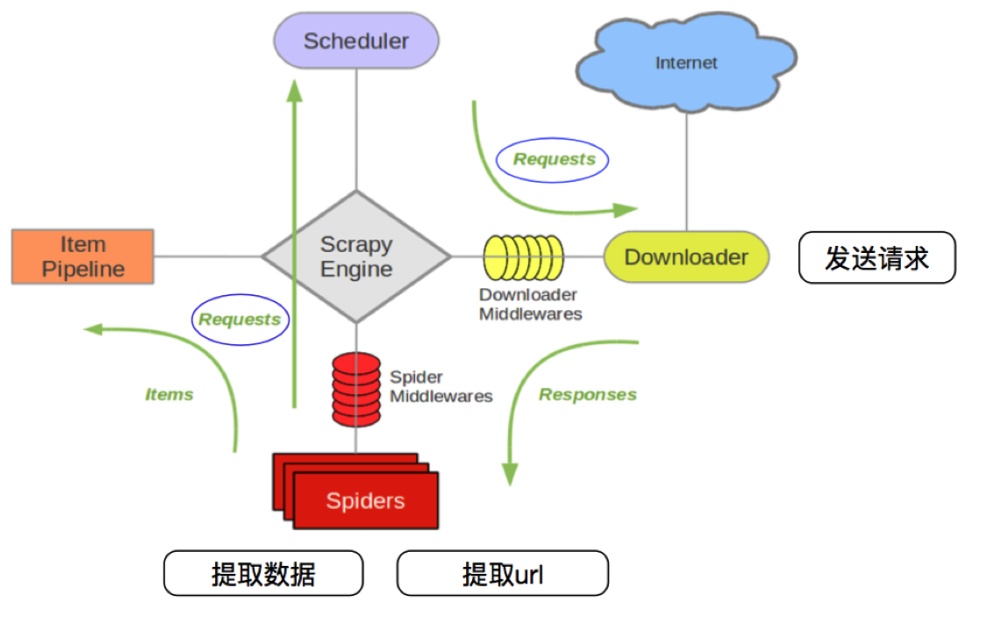
流程描述
- 爬虫中起始的
url构造成request对象-->爬虫中间件-->引擎-->调度器 - 调度器把
request-->引擎-->下载中间件-->下载器 - 下载器发送请求,获取
response响应---->下载中间件---->引擎--->爬虫中间件--->爬虫 - 爬虫提取
url地址,组装成request对象---->爬虫中间件--->引擎--->调度器,重复第二个步骤 - 爬虫提取数据--->引擎--->管道处理和保存数据
注意点
- 图中绿色线条表示数据的传递
- 注意图中中间件的位置,决定了其作用
- 注意其中引擎的位置,所有的模块之前相互独立,只和引擎进行交互
Scrapy内置的三个对象
request请求对象:由url、method、post_data、headers等构成response响应对象:由url、body、status、headers等构成item数据对象:本质是个字典
Scrapy内置模块图解
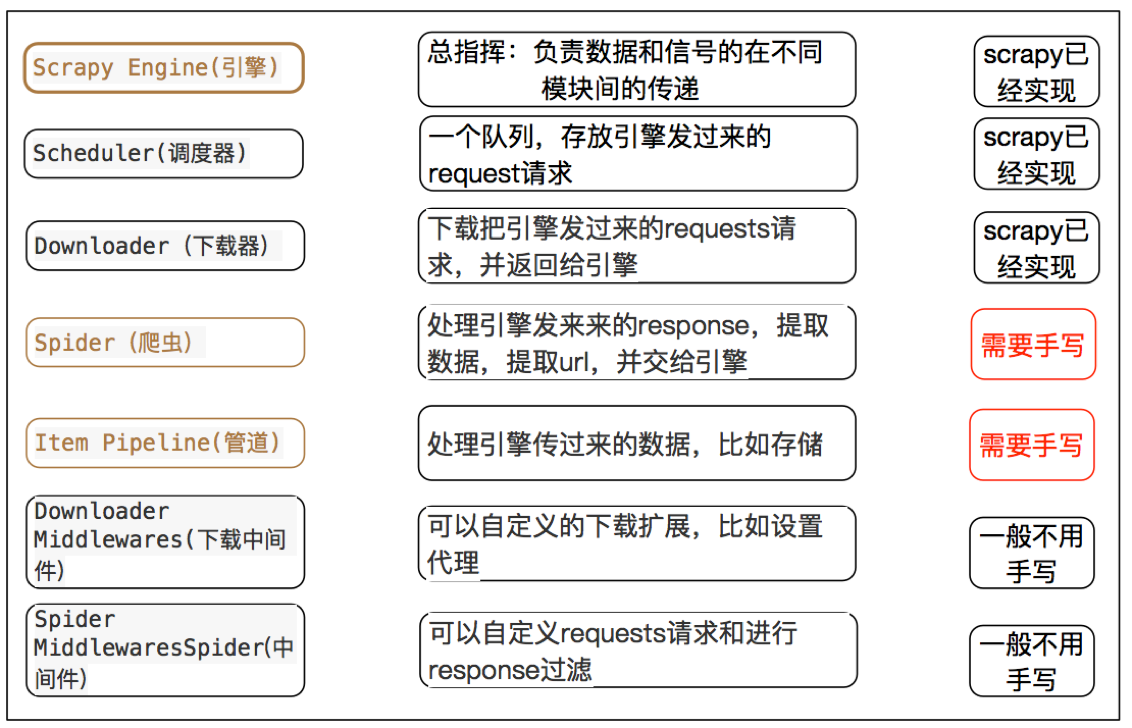
注意:爬虫中间件和下载中间件只是运行逻辑的位置不同,作用是重复的:如替换User-Agent等。
2.Scrapy框架的安装
安装指令
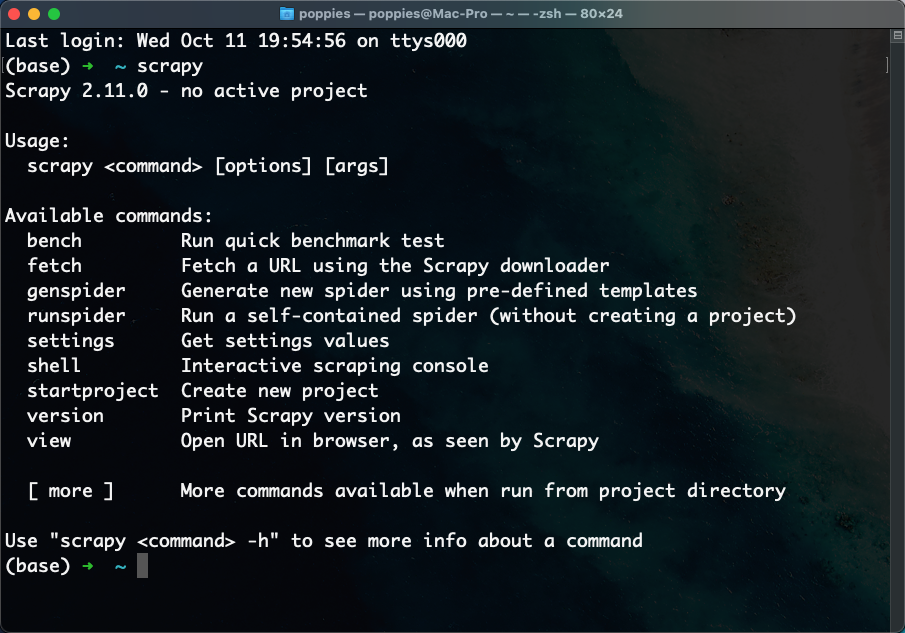
pip install scrapy -i https://pypi.tuna.tsinghua.edu.cn/simple环境测试
在终端中输入scrapy,如果能看到如下效果,说明安装成功。
3.第一个Scrapy项目
创建Scrapy项目结构
# scrapy startproject 项目名称
scrapy startproject mySpider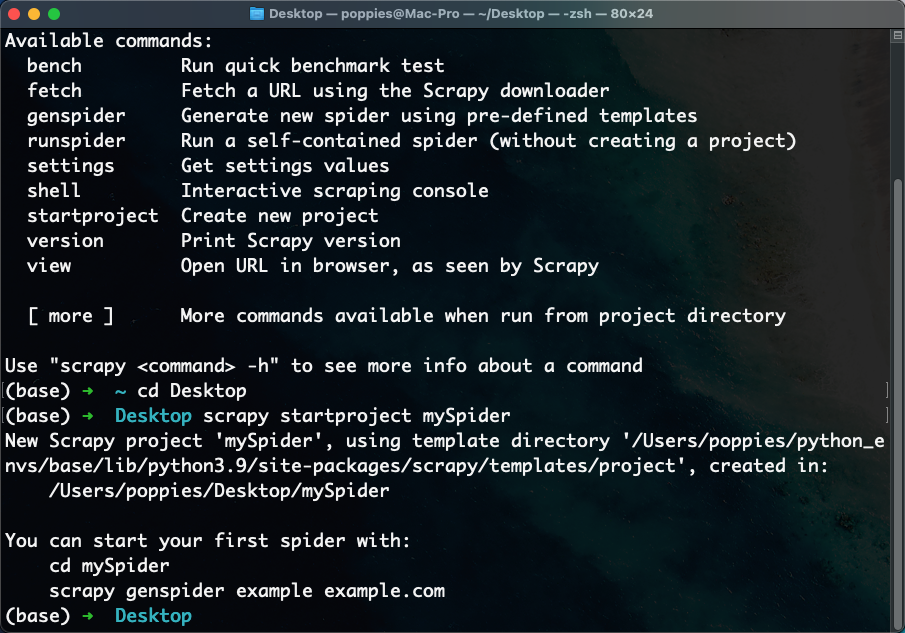
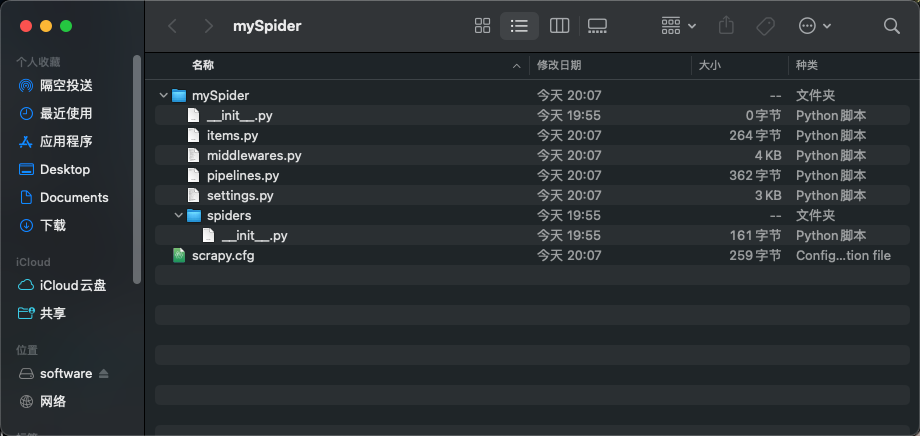
执行完成后会创建一个项目文件夹,文件夹结构如下:
创建爬虫
# scrapy genspider 爬虫名 允许爬取的域名
scrapy genspider baidu baidu.com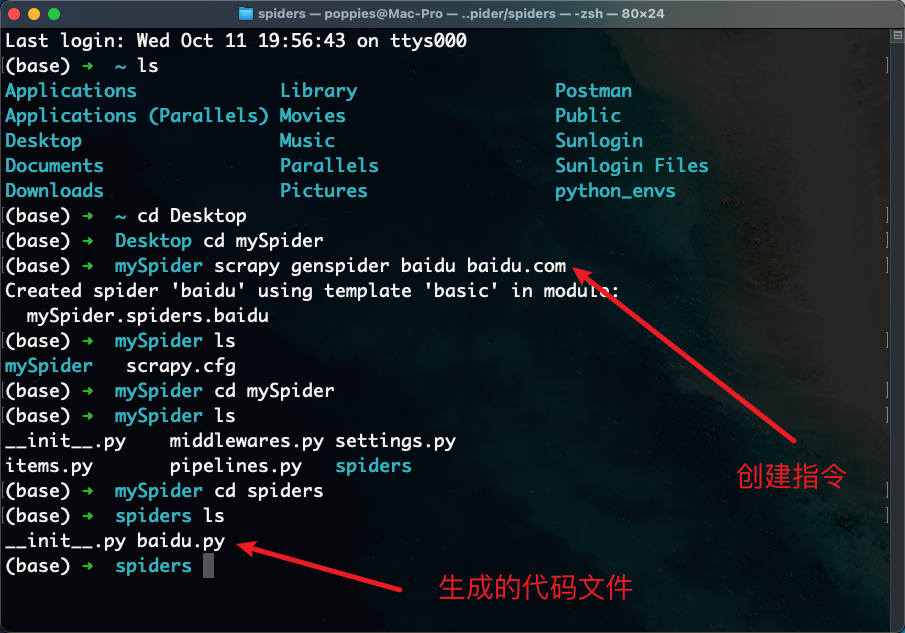
生成的爬虫代码文件内容如下:
import scrapy


class BaiduSpider(scrapy.Spider):
    # 爬虫名称
    name = "baidu"

    # 允许爬取的域名
    allowed_domains = ["baidu.com"]
    # 爬取地址
    start_urls = ["https://baidu.com"]

    # 数据解析方法,之后需要我们自己编写逻辑
    def parse(self, response):
pass运行爬虫文件
在项目目录下执行scrapy crawl 爬虫名称
# 在终端中输入命令
scrapy crawl baidu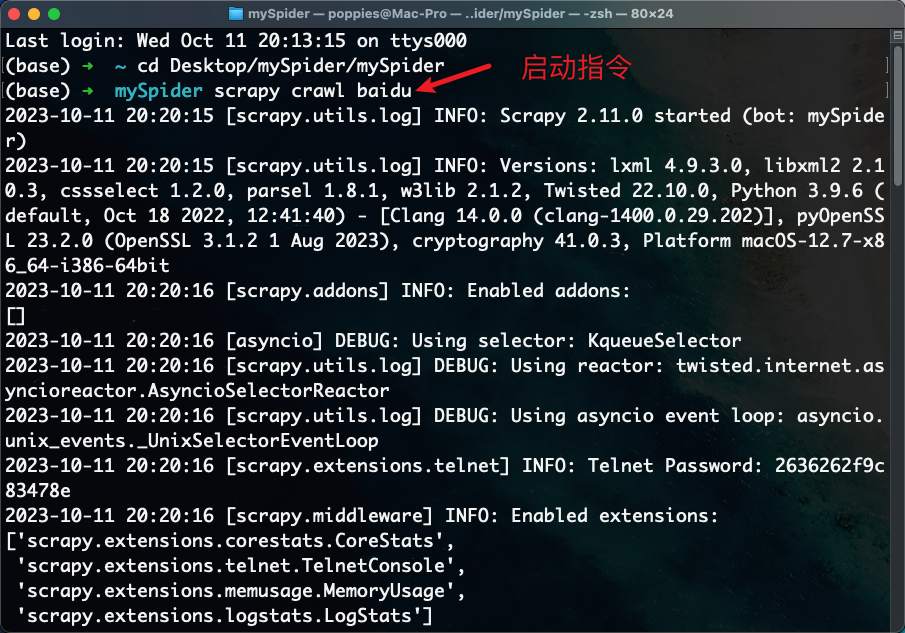
注意点:
- 这个案例并没有对爬取到的数据进行任何操作,怎样提取数据等后面讲解
- 本案例就是让大家对
scrapy的使用大体有个了解即可
总结
- 用
Scrapy来实现爬虫,并不是我们想象的那样创建一个.py然后在这个文件中import导入,而是通过scrapy命令来构建相关的目录结构,最终通过命令来开启scrapy Scrapy使用流程:- 创建
Scrapy项目,命令是scrapy startproject 项目名称 - 进入到创建出来的
Scrapy项目文件夹 - 创建爬虫,命令是:
scrapy genspider 爬虫名 允许爬取的域名 - 运行
Scrapy,命令是:scrapy crawl 爬虫名
- 创建
4.数据提取
案例需求
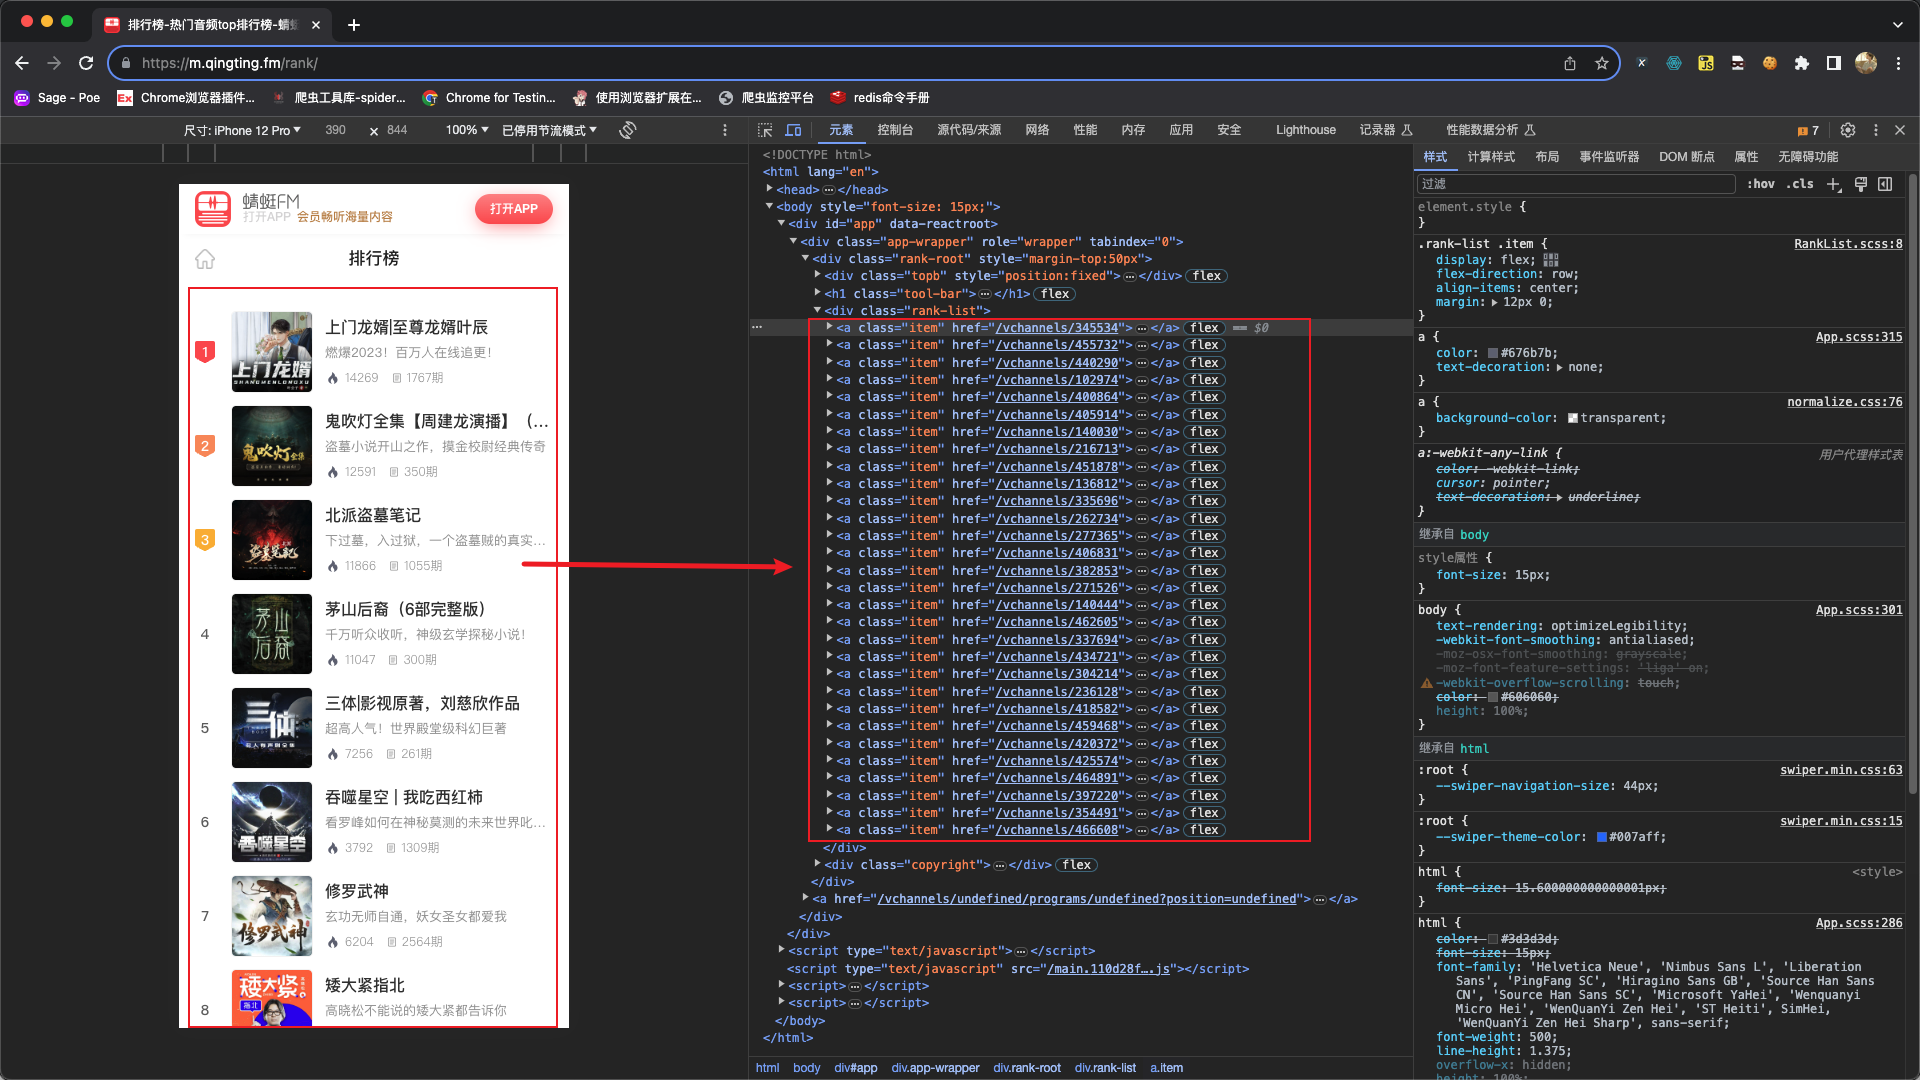
我们以爬取蜻蜓FM排行榜为例进行学习如何使用Scrapy提取数据
网站地址:https://m.qingting.fm/rank/
项目创建
# 创建项目目录
scrapy startproject fm

# 进入项目根目录
cd fm

# 创建爬虫文件
scrapy genspider qingting https://m.qingting.fm/rank/parse方法的探讨
我们为了能够对获取到的数据进行操作,需要在
parse函数中完成数据的提取等操作
import scrapy
from scrapy import cmdline
# 导入response响应对象的类型
from scrapy.http import HtmlResponse


class QingtingSpider(scrapy.Spider):
    # 爬虫名称
    name = "qingting"

    # 允许抓取的域名
    allowed_domains = ["m.qingting.fm"]
    # 抓取地址
    start_urls = ["https://m.qingting.fm/rank/"]

    # 设定当前函数接收的response对象的类型,方便语法提示
    def parse(self, response: HtmlResponse, **kwargs):
        """
        :param response:
        :return:
        此函数为回调函数,当对start_url进行请求后,会将请求完成的响应对象传递给此函数
            response参数接收响应对象
        """
        # 验证当前函数是否被调用
        print(response)


if __name__ == '__main__':
    # 使用scrapy框架自带的命令工具来启动爬虫脚本
cmdline.execute('scrapy crawl qingting'.split())知识点补充
在Scrapy框架中可以使用cmdline.execute()方法来执行启动命令,启动命令有以下两种:
from scrapy import cmdline  # 导入运行指令的工具


# 默认启动方式,打印日志信息
cmdline.execute('scrapy crawl qingting'.split())

# 忽略日志信息
cmdline.execute('scrapy crawl qingting --nolog'.split())parse函数中对response参数的探究
通过以上代码示例可以看出,parse函数是在scrapy运行时,被自动调用的,且从默认生成的parse函数的参数名是response能够看出,parese函数应该是scrapy对start_urls中的URL爬取之后,接收的响应对象。
所以,我们只需要在parse函数中使用之前学习过的提取数据的方式提取数据即可,例如正则表达式、Xpath等。
response响应对象的常用属性
为了能够在parse函数中对response进行操作,下面列举了常用的response属性:
response.url:当前响应的url地址response.request.url:当前响应对应的请求的url地址response.headers:响应头response.request.headers:当前响应的请求头response.body:响应体,也就是html代码,并且数据返回类型为byte类型response.status:响应状态码
import scrapy
from scrapy import cmdline
from scrapy.http import HtmlResponse


class QingtingSpider(scrapy.Spider):
    # 爬虫名称
    name = "qingting"

    # 允许抓取的域名
    allowed_domains = ["m.qingting.fm"]
    # 抓取地址
    start_urls = ["https://m.qingting.fm/rank/"]

    def parse(self, response: HtmlResponse, **kwargs):
        """
        :param response:
        :return:
        此函数为回调函数,当对start_url进行请求后,会将请求完成的响应对象传递给此函数
            response参数接收响应对象
        """
        # 验证当前函数是否被调用
        print(response)

        # response常用属性的使用
        print("---1--->", response.url)  # 响应的url地址
        print("---2--->", response.headers)  # 响应头
        print("---3--->", response.status)  # 响应状态码
        print("---4--->", response.body)  # 响应体
        print("---5--->", response.request.url)  # 请求地址
        print("---6--->", response.request.headers)  # 请求头


if __name__ == '__main__':
cmdline.execute('scrapy crawl qingting'.split())数据解析
可以使用response响应对象中提供的xpath方法提取数据
import scrapy
from scrapy import cmdline
from scrapy.http import HtmlResponse


class QingtingSpider(scrapy.Spider):
    # 爬虫名称
    name = "qingting"

    # 允许抓取的域名
    allowed_domains = ["m.qingting.fm"]
    # 抓取地址
    start_urls = ["https://m.qingting.fm/rank/"]

    def parse(self, response: HtmlResponse, **kwargs):
        a_list = response.xpath('//div[@class="rank-list"]/a')
        # print(a_list)
        for a_temp in a_list:
            rank_number = a_temp.xpath('./div[@class="badge"]/text()')  # 排名
            img_url = a_temp.xpath('./img/@src')  # 图片地址
            title = a_temp.xpath('./div[@class="content"]/div[@class="title"]/text()')  # 标题
            desc = a_temp.xpath('./div[@class="content"]/div[@class="desc"]/text()')  # 描述
            play_number = a_temp.xpath('.//div[@class="info-item"][1]/span/text()')
            print('---***--->', rank_number, img_url, title, desc, play_number)


if __name__ == '__main__':
cmdline.execute('scrapy crawl qingting'.split())以上案例中使用response.xpath方法所获取的数据是类似列表的数据集,其中包含的是selector对象,操作和列表一样,但是有一些额外的方法。
extract方法:返回一个包含有字符串的列表extract_first方法:返回列表中的第一个字符串,列表为空返回None
extract()方法
import scrapy
from scrapy import cmdline
from scrapy.http import HtmlResponse


class QingtingSpider(scrapy.Spider):
    name = 'qingting'
    allowed_domains = ['qingting.fm']
    start_urls = ['https://m.qingting.fm/rank/']

    def parse(self, response: HtmlResponse, **kwargs):
        a_list = response.xpath("//div[@class='rank-list']//a")
        for a_temp in a_list:
            rank_number = a_temp.xpath("./div[@class='badge']//text()").extract()
            img_url = a_temp.xpath("./img/@src").extract()
            title = a_temp.xpath("./div[@class='content']/div[@class='title']/text()").extract()
            desc = a_temp.xpath("./div[@class='content']/div[@class='desc']/text()").extract()
            play_number = a_temp.xpath(".//div[@class='info-item'][1]/span/text()").extract()
            print("---***--->", rank_number, img_url, title, desc, play_number)


if __name__ == '__main__':
cmdline.execute('scrapy crawl qingting'.split())返回结果如下:

extract_first()方法
import scrapy
from scrapy import cmdline
from scrapy.http import HtmlResponse


class QingtingSpider(scrapy.Spider):
    name = 'qingting'
    allowed_domains = ['qingting.fm']
    start_urls = ['https://m.qingting.fm/rank/']

    def parse(self, response: HtmlResponse, **kwargs):
        a_list = response.xpath("//div[@class='rank-list']//a")
        for a_temp in a_list:
            rank_number = a_temp.xpath("./div[@class='badge']//text()").extract_first()
            img_url = a_temp.xpath("./img/@src").extract_first()
            title = a_temp.xpath("./div[@class='content']/div[@class='title']/text()").extract_first()
            desc = a_temp.xpath("./div[@class='content']/div[@class='desc']/text()").extract_first()
            play_number = a_temp.xpath(".//div[@class='info-item'][1]/span/text()").extract_first()
            print("---***--->", rank_number, img_url, title, desc, play_number)


if __name__ == '__main__':
cmdline.execute('scrapy crawl qingting'.split())返回结果如下:

总结
parse函数就是Scrapy在得到HTTP(S)响应之后回调的函数。parse函数中默认的参数就是将响应数据封装为字典的对象,这个对象可以直接使用xpath进行数据的提取,使得在处理非结构化数据(一般指html文件)时非常方便。
5.管道的基本使用
管道的作用
对parse函数中提取到的数据进一步处理的操作,例如保存到csv、MongoDB、MySQL等。
管道的触发条件
修改爬虫文件qingting.py中parse()函数
import scrapy
from scrapy import cmdline
from scrapy.http import HtmlResponse


class QingtingSpider(scrapy.Spider):
    name = 'qingting'
    allowed_domains = ['qingting.fm']
    start_urls = ['https://m.qingting.fm/rank/']

    def parse(self, response: HtmlResponse, **kwargs):
        a_list = response.xpath("//div[@class='rank-list']/a")
        for a_temp in a_list:
            rank_number = a_temp.xpath("./div[@class='badge']//text()").extract_first()
            img_url = a_temp.xpath("./img/@src").extract_first()
            title = a_temp.xpath("./div[@class='content']/div[@class='title']/text()").extract_first()
            desc = a_temp.xpath("./div[@class='content']/div[@class='desc']/text()").extract_first()
            play_number = a_temp.xpath(".//div[@class='info-item'][1]/span/text()").extract_first()

            # 使用yield关键字将解析的数据返回给pipline
            yield {
                'rank_number': rank_number,
                'img_url': img_url,
                'title': title,
                'desc': desc,
                'play_number': play_number
            }


if __name__ == '__main__':
cmdline.execute('scrapy crawl qingting --nolog'.split())思考:为什么使用yield返回数据?
- 遍历这个函数的返回值的时候,挨个把数据读到内存,不会造成内存的瞬间占用过高,
Python3中的range和python2中的xrange同理。 Scrapy是异步爬取,所以通过yield能够将运行权限教给其他的协程任务去执行,这样整个程序运行效果会更高。
注意点:解析函数中的yield能够传递的对象只能是:BaseItem、Request、dict、None
修改
process_item方法
在项目中找到pipline.py文件并修改:
# Define your item pipelines here
#
# Don't forget to add your pipeline to the ITEM_PIPELINES setting
# See: https://docs.scrapy.org/en/latest/topics/item-pipeline.html


# useful for handling different item types with a single interface
from itemadapter import ItemAdapter


class FmPipeline:
    def process_item(self, item, spider):
        """
        :param item:
        :param spider:
        :return:
        当前函数是一个回调函数,在spider爬虫文件中使用了yield返回数据之后,则自动调用管道方法
            注意点: 需要在配置文件中打开管道配置
        """
        print(item)
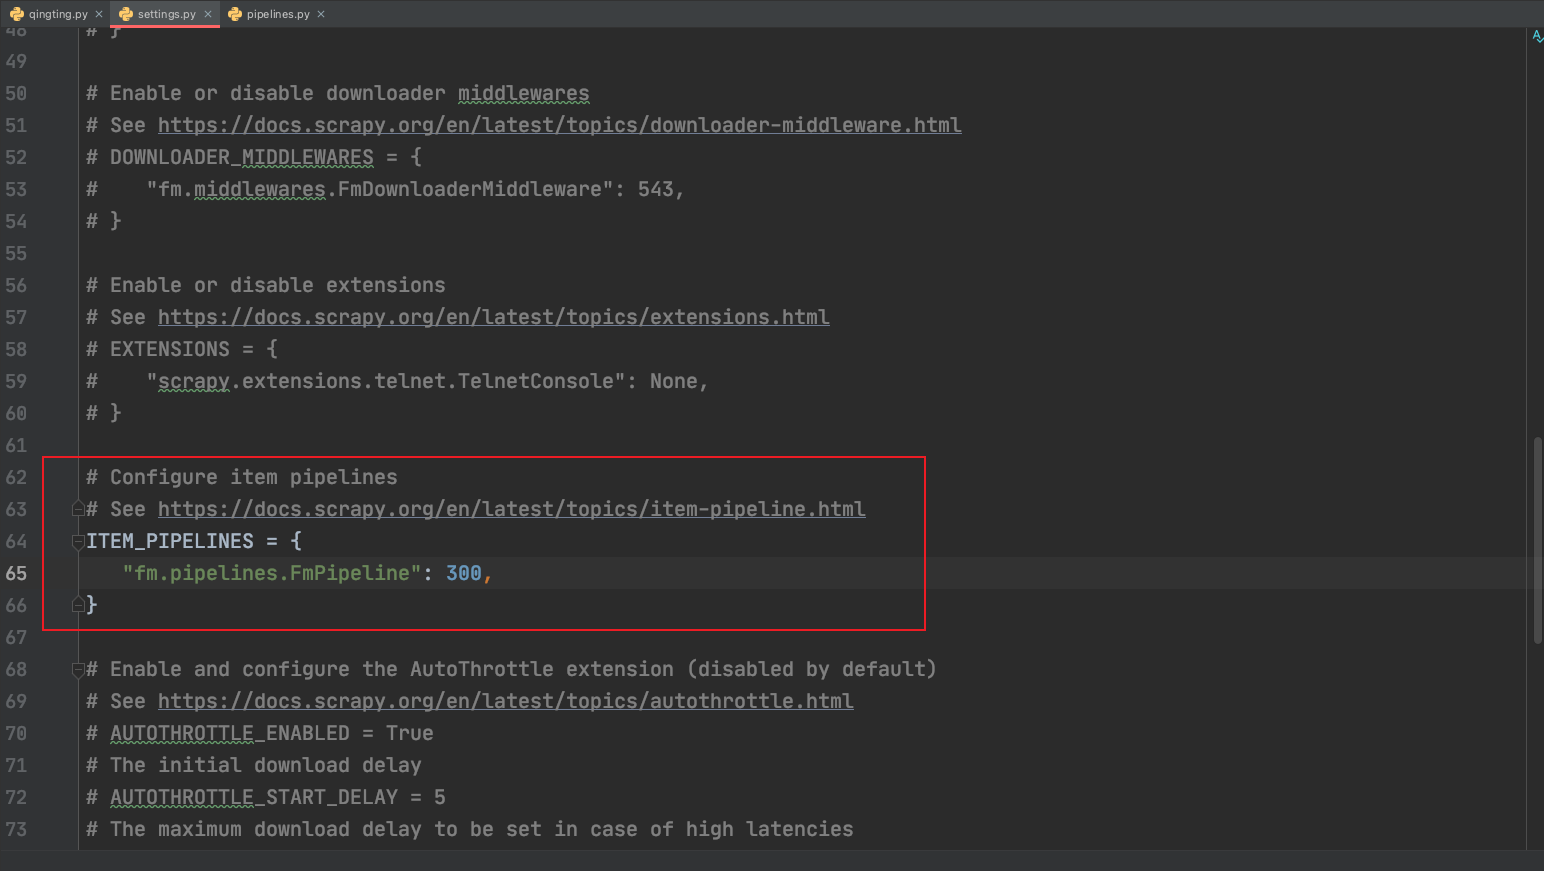
# return item在
settings.py文件中开启管道配置
6.深入理解Scrapy框架执行流程
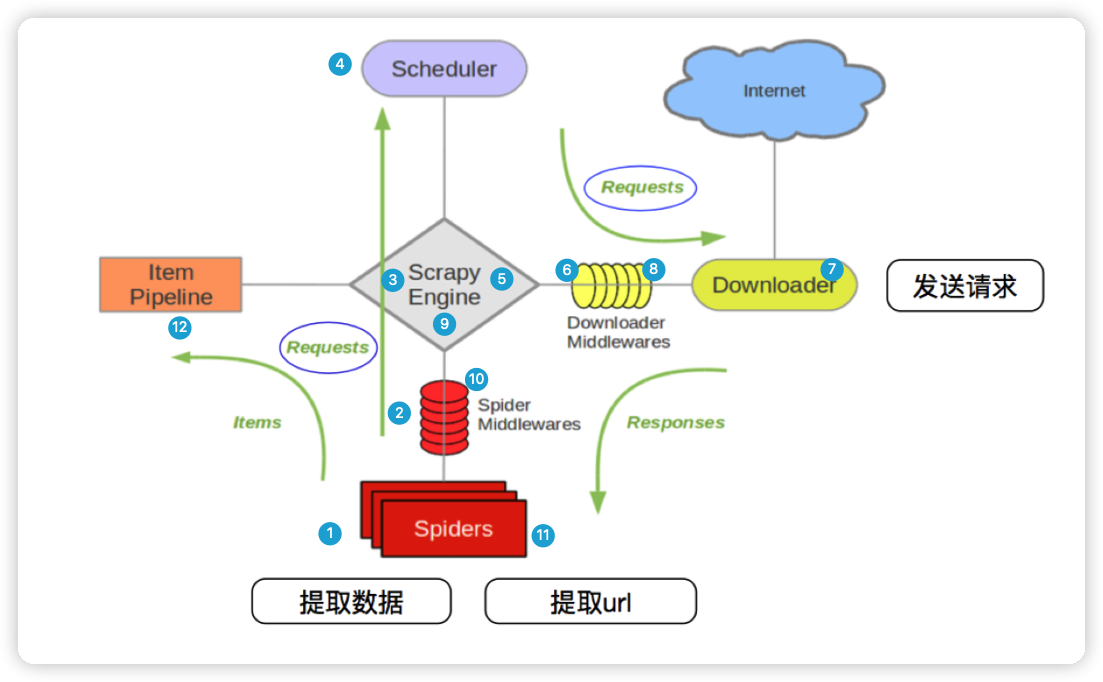
上图中的1 - 12序号的解释说明:
Scrapy从Spider子类中提取start_urls,然后构造为request请求对象- 将
request请求对象传递给爬虫中间件 - 将
request请求对象传递给Scrapy引擎(就是核心代码) - 将
request请求对象传递给调度器(它负责对多个request调度,好比交通管理员负责交通的指挥员) - 将
request请求对象传递给Scrapy引擎 Scrapy引擎将request请求对象传递给下载中间件(可以更换代理IP,更换Cookies,更换User-Agent,自动重试。等)request请求对象传给到下载器(它通过异步的发送HTTP(S)请求),得到响应封装为response对象- 将
response对象传递给下载中间件 - 下载中间件将
response对象传递给Scrapy引擎 Scrapy引擎将response对象传递给爬虫中间件(这里可以处理异常等情况)- 爬虫对象中的
parse函数被调用(在这里可以对得到的response对象进行处理,例如用status得到响应状态码,xpath可以进行提取数据等) - 将提取到的数据传递给
Scrapy引擎,它将数据再传递给管道(在管道中我们可以将数据存储到csv、MongoDB等)
7.多数据保存
在解析response响应对象的过程当中,解析出来的数据可能是一个新的可访问的URL,如果需要对解析出来的URL地址进行请求并获取数据该如何完成?
确定需求
从响应对象中提取URL,对这样的URL也发送请求然后提取它的数据。
项目准备
- 创建蜻蜓FM项目:
scrapy startproject fm - 进入到
fm文件夹,创建qingting爬虫:scrapy genspider qingting qingting.fm/rank - 编辑
spiders/qingting.py
import scrapy
from scrapy import cmdline
from scrapy.http import HtmlResponse


class QingtingSpider(scrapy.Spider):
    name = 'qingting'

    # 注意点: 当前图片域名与蜻蜓FM域名不一致
    # allowed_domains = ['qingting.fm']
    allowed_domains = ['qingting.fm', 'pic.qtfm.cn']
    start_urls = ['https://m.qingting.fm/rank/']

    def parse(self, response: HtmlResponse, **kwargs):
        a_list = response.xpath("//div[@class='rank-list']/a")
        for a_temp in a_list:
            rank_number = a_temp.xpath("./div[@class='badge']//text()").extract_first()
            img_url = a_temp.xpath("./img/@src").extract_first()
            title = a_temp.xpath("./div[@class='content']/div[@class='title']/text()").extract_first()
            desc = a_temp.xpath("./div[@class='content']/div[@class='desc']/text()").extract_first()
            play_number = a_temp.xpath(".//div[@class='info-item'][1]/span/text()").extract_first()

            # 使用yield关键字将解析的数据返回给pipline
            yield {
                'rank_number': rank_number,
                'img_url': img_url,
                'title': title,
                'desc': desc,
                'play_number': play_number
            }

            # 构造新的请求对象: 使用cb_kwargs传递形参
            yield scrapy.Request(img_url, callback=self.parse_image, cb_kwargs={"image_name": title})

    # 解析图片方法
    def parse_image(self, response, image_name):
        # print('图片解析方法:', response.url)
        # print(image_name)
        # print(response.body)
        yield {
            "image_name": image_name + ".png",
            "image_content": response.body
        }


if __name__ == '__main__':
cmdline.execute('scrapy crawl qingting --nolog'.split())图片保存
在pipline.py中编辑代码:
# Define your item pipelines here
#
# Don't forget to add your pipeline to the ITEM_PIPELINES setting
# See: https://docs.scrapy.org/en/latest/topics/item-pipeline.html


# useful for handling different item types with a single interface
import os
from itemadapter import ItemAdapter


class FmPipeline:
    def process_item(self, item, spider):
        # getcwd(): 用于获取当前工作目录(Current Working Directory)的路径
        download_path = os.getcwd() + '/download/'
        if not os.path.exists(download_path):
            os.mkdir(download_path)

        # 图片保存
        image_name = item.get("image_name")
        image_content = item.get("image_content")
        if image_name:
            with open(download_path + image_name, "wb") as f:
                f.write(image_content)
print("图片保存成功: ", image_name)代码编写完成后开启管道并运行爬虫脚本。
在代码运行完毕后会输出大量的Scrapy日志信息,我们可以输出的日志信息简化,配置如下:
# 在settings.py中写入配置项
# 设置scrapy日志信息级别为warning, 忽略info信息

LOG_LEVEL = 'WARNING'保存图片的同时一并保存FM信息
在process_item函数中,我们可以将图片保存到文件中,那么如果既想保存图片,又想保存在parse函数中提取到的信息应该怎么办呢?
在代码内部判断数据是图片还是信息,如果是图片就保存到图片文件,如果是信息就保存到csv文件或者存储到数据库中。
代码如下:
qingting.py
import scrapy
from scrapy import cmdline
from scrapy.http import HtmlResponse


class QingtingSpider(scrapy.Spider):
    name = 'qingting'

    # 注意点: 当前图片域名与蜻蜓FM域名不一致
    # allowed_domains = ['qingting.fm']
    allowed_domains = ['qingting.fm', 'pic.qtfm.cn']
    start_urls = ['https://m.qingting.fm/rank/']

    def parse(self, response: HtmlResponse, **kwargs):
        a_list = response.xpath("//div[@class='rank-list']/a")
        for a_temp in a_list:
            rank_number = a_temp.xpath("./div[@class='badge']//text()").extract_first()
            img_url = a_temp.xpath("./img/@src").extract_first()
            title = a_temp.xpath("./div[@class='content']/div[@class='title']/text()").extract_first()
            desc = a_temp.xpath("./div[@class='content']/div[@class='desc']/text()").extract_first()
            play_number = a_temp.xpath(".//div[@class='info-item'][1]/span/text()").extract_first()

            # 使用yield关键字将解析的数据返回给pipline
            yield {
                'type': 'info',
                'rank_number': rank_number,
                'img_url': img_url,
                'title': title,
                'desc': desc,
                'play_number': play_number
            }

            # 构造新的请求对象: 使用cb_kwargs传递形参
            yield scrapy.Request(img_url, callback=self.parse_image, cb_kwargs={"image_name": title})

    # 解析图片方法
    def parse_image(self, response, image_name):
        # print('图片解析方法:', response.url)
        # print(image_name)
        # print(response.body)
        yield {
            'type': 'image',
            "image_name": image_name + ".png",
            "image_content": response.body
        }


if __name__ == '__main__':
    cmdline.execute('scrapy crawl qingting --nolog'.split())
pipeline.py
# Define your item pipelines here
#
# Don't forget to add your pipeline to the ITEM_PIPELINES setting
# See: https://docs.scrapy.org/en/latest/topics/item-pipeline.html


# useful for handling different item types with a single interface
import os
import pymongo
from itemadapter import ItemAdapter


class FmPipeline:
    def process_item(self, item, spider):
        # 获取返回的数据类型
        type_ = item.get('type')
        if type_ == 'image':
            # getcwd(): 用于获取当前工作目录(Current Working Directory)的路径
            download_path = os.getcwd() + '/download/'
            if not os.path.exists(download_path):
                os.mkdir(download_path)
            # 图片保存
            image_name = item.get("image_name")
            image_content = item.get("image_content")
            with open(download_path + image_name, "wb") as f:
                f.write(image_content)
                print("图片保存成功: ", image_name)
        elif type_ == 'info':
            mongo_client = pymongo.MongoClient()
            collection = mongo_client['py_spider']['qingtingFM']
            collection.insert_one(item)
            print('数据插入成功:', item.get('title'))
        else:
print('数据类型不符合规定...')8.案例:豆瓣爬虫
项目构建
命令如下:
# 项目创建
scrapy startproject douban

# 爬虫文件创建
cd douban
scrapy genspider top250 https://movie.douban.com/top250?start=0&filter=spiders文件夹下的top250.py文件内容如下:
import scrapy
from scrapy import cmdline
from scrapy.http import HtmlResponse


class Top250Spider(scrapy.Spider):
    name = "top250"
    allowed_domains = ["douban.com"]
    start_urls = ["https://movie.douban.com/top250?start=0&filter="]

    def parse(self, response: HtmlResponse, **kwargs):
        pass


if __name__ == '__main__':
cmdline.execute('scrapy crawl top250'.split())数据解析
import scrapy
from scrapy import cmdline
from scrapy.http import HtmlResponse


class Top250Spider(scrapy.Spider):
    name = "top250"
    allowed_domains = ["douban.com"]
    start_urls = ["https://movie.douban.com/top250?start=0&filter="]

    def parse(self, response: HtmlResponse, **kwargs):
        # 查看请求头信息
        # print(response.request.headers)

        li_list = response.xpath("//ol[@class='grid_view']/li")
        for li_temp in li_list:
            image = li_temp.xpath(".//img/@src").extract_first()
            title = li_temp.xpath(".//span[@class='title'][1]/text()").extract_first()
            rating_num = li_temp.xpath(".//span[@class='rating_num']/text()").extract_first()
            people_num = li_temp.xpath(".//div[@class='star']/span[4]/text()").extract_first()

            # 信息验证
            print('--->', image, title, rating_num, people_num)


if __name__ == '__main__':
cmdline.execute('scrapy crawl top250'.split())注意点:
豆瓣网站设置了rebots.txt验证,需要在settings.py文件中关闭rebots.txt验证。
ROBOTSTXT_OBEY = False另外需要在setting.py中设置爬虫的User-Agent。
# 方式一
USER_AGENT = "Mozilla/5.0 (Macintosh; Intel Mac OS X 10_15_7) AppleWebKit/537.36 " \
             "(KHTML, like Gecko) Chrome/117.0.0.0 Safari/537.36"


# 方式二
DEFAULT_REQUEST_HEADERS = {
    "User-Agent": "Mozilla/5.0 (Macintosh; Intel Mac OS X 10_15_7) AppleWebKit/537.36 "
                  "(KHTML, like Gecko) Chrome/117.0.0.0 Safari/537.36"
}


"""
在配置文件中设置的请求头是固定的, 如果发送的请求过多也可能造成当前请求头失效。
所以需要在请求的过程中要对请求头进行随机变换,想要完成这种功能需要借助中间件完成。
"""9.Scrapy中间件的使用
Scrapy中间件的分类
根据Scrapy运行流程中所在位置不同分为:
- 下载中间件
- 爬虫中间件
中间件的作用
预处理request和response对象
- 如果响应状态码不是200则请求重试(重新构造
Request对象返回给引擎) - 可以对
header以及cookie进行更换和处理 - 使用代理
ip等
但在Scrapy默认的情况下,两种中间件都在middlewares.py一个文件中。爬虫中间件使用方法和下载中间件相同,且功能重复,常使用下载中间件。
下载中间件的内部方法
Downloader Middlewares默认的方法:
process_request(self, request, spider)- 当每个
request通过下载中间件时,该方法被调用 - 返回
None值:没有return也是返回None,该request对象传递给下载器,或通过引擎传递给其他权重低的process_request方法 - 返回
Response对象:不再请求,把response返回给引擎 - 返回
Request对象:把request对象通过引擎交给调度器,此时将不通过其他权重低的process_request方法
- 当每个
process_response(self, request, response, spider)- 当下载器完成
http请求,传递响应给引擎的时候调用 - 返回
Resposne对象:通过引擎交给爬虫处理或交给权重更低的其他下载中间件的process_response方法 - 返回
Request对象:通过引擎交给调度器继续请求,此时将不通过其他权重低的process_request方法
- 当下载器完成
注意:需要在settings.py文件中开启中间件,权重越小越优先执行。
下载中间件代码示例 - 随机User-Agent
import random


class UserAgentDownloaderMiddleware:
    USER_AGENTS_LIST = [
        "Mozilla/5.0 (compatible; MSIE 9.0; Windows NT 6.1; Win64; x64; Trident/5.0; .NET CLR 3.5.30729; .NET CLR 3.0.30729; .NET CLR 2.0.50727; Media Center PC 6.0)",
        "Mozilla/5.0 (compatible; MSIE 8.0; Windows NT 6.0; Trident/4.0; WOW64; Trident/4.0; SLCC2; .NET CLR 2.0.50727; .NET CLR 3.5.30729; .NET CLR 3.0.30729; .NET CLR 1.0.3705; .NET CLR 1.1.4322)",
        "Mozilla/4.0 (compatible; MSIE 7.0b; Windows NT 5.2; .NET CLR 1.1.4322; .NET CLR 2.0.50727; InfoPath.2; .NET CLR 3.0.04506.30)",
        "Mozilla/5.0 (Windows; U; Windows NT 5.1; zh-CN) AppleWebKit/523.15 (KHTML, like Gecko, Safari/419.3) Arora/0.3 (Change: 287 c9dfb30)",
        "Mozilla/5.0 (X11; U; Linux; en-US) AppleWebKit/527+ (KHTML, like Gecko, Safari/419.3) Arora/0.6",
        "Mozilla/5.0 (Windows; U; Windows NT 5.1; en-US; rv:1.8.1.2pre) Gecko/20070215 K-Ninja/2.1.1",
        "Mozilla/5.0 (Windows; U; Windows NT 5.1; zh-CN; rv:1.9) Gecko/20080705 Firefox/3.0 Kapiko/3.0",
        "Mozilla/5.0 (X11; Linux i686; U;) Gecko/20070322 Kazehakase/0.4.5"
    ]

    def process_request(self, request, spider):
        print("------下载中间件----")
        # 随机选择UA
        user_agent = random.choice(self.USER_AGENTS_LIST)
        request.headers['User-Agent'] = user_agent
        # 不写return
        """
        如果返回None, 表示当前的response提交下一个权重低的process_request。
        如果传递到最后一个process_request,则传递给下载器进行下载。
"""在settings.py中设置中间件:
DOWNLOADER_MIDDLEWARES = {
    "douban.middlewares.DoubanDownloaderMiddleware": 543,
    "douban.middlewares.UserAgentDownloaderMiddleware": 400
}豆瓣爬虫代码完善
top250.py
import scrapy
from scrapy import cmdline
from scrapy.http import HtmlResponse


class Top250Spider(scrapy.Spider):
    name = "top250"

    # 图片域名与网站域名不一致
    allowed_domains = ["douban.com", "doubanio.com"]
    start_urls = ["https://movie.douban.com/top250?start=0&filter="]

    def parse(self, response: HtmlResponse, **kwargs):
        # 查看请求头信息
        # print(response.request.headers)

        li_list = response.xpath("//ol[@class='grid_view']/li")
        for li_temp in li_list:
            image_url = li_temp.xpath(".//img/@src").extract_first()
            title = li_temp.xpath(".//span[@class='title'][1]/text()").extract_first()
            rating_num = li_temp.xpath(".//span[@class='rating_num']/text()").extract_first()
            people_num = li_temp.xpath(".//div[@class='star']/span[4]/text()").extract_first()

            # 信息验证
            # print('--->', image, title, rating_num, people_num)

            yield {
                'type': 'info',
                'image': image_url,
                'title': title,
                'rating_num': rating_num,
                'people_num': people_num
            }

            # 创建新的请求对象下载图片
            yield scrapy.Request(url=image_url, callback=self.parse_image, cb_kwargs={'image_name': title})

    def parse_image(self, response, image_name):
        yield {
            'type': 'image',
            'image_name': image_name + '.jpg',
            'image_content': response.body
        }


if __name__ == '__main__':
    cmdline.execute('scrapy crawl top250'.split())
pipelines.py
# Define your item pipelines here
#
# Don't forget to add your pipeline to the ITEM_PIPELINES setting
# See: https://docs.scrapy.org/en/latest/topics/item-pipeline.html


# useful for handling different item types with a single interface
import os
import pymongo
from itemadapter import ItemAdapter


class DoubanPipeline:
    def process_item(self, item, spider):
        type_ = item.get('type')
        if type_ == 'info':
            mongo_client = pymongo.MongoClient()
            collection = mongo_client['py_spider']['movie_info']
            collection.insert_one(item)
            print('数据插入成功:', item.get('title'))
        elif type_ == 'image':
            print(type_)
            download_path = os.getcwd() + '/download/'
            if not os.path.exists(download_path):
                os.mkdir(download_path)
            # 图片保存
            image_name = item.get("image_name")
            image_content = item.get("image_content")
            with open(download_path + image_name, "wb") as f:
                f.write(image_content)
                print("图片保存成功: ", image_name)
        else:
            print('数据类型不符合规定...')

        # return item
middlewares.py
class UserAgentDownloaderMiddleware:
    USER_AGENTS_LIST = [
        "Mozilla/5.0 (compatible; MSIE 9.0; Windows NT 6.1; Win64; x64; Trident/5.0; .NET CLR 3.5.30729; .NET CLR 3.0.30729; .NET CLR 2.0.50727; Media Center PC 6.0)",
        "Mozilla/5.0 (compatible; MSIE 8.0; Windows NT 6.0; Trident/4.0; WOW64; Trident/4.0; SLCC2; .NET CLR 2.0.50727; .NET CLR 3.5.30729; .NET CLR 3.0.30729; .NET CLR 1.0.3705; .NET CLR 1.1.4322)",
        "Mozilla/4.0 (compatible; MSIE 7.0b; Windows NT 5.2; .NET CLR 1.1.4322; .NET CLR 2.0.50727; InfoPath.2; .NET CLR 3.0.04506.30)",
        "Mozilla/5.0 (Windows; U; Windows NT 5.1; zh-CN) AppleWebKit/523.15 (KHTML, like Gecko, Safari/419.3) Arora/0.3 (Change: 287 c9dfb30)",
        "Mozilla/5.0 (X11; U; Linux; en-US) AppleWebKit/527+ (KHTML, like Gecko, Safari/419.3) Arora/0.6",
        "Mozilla/5.0 (Windows; U; Windows NT 5.1; en-US; rv:1.8.1.2pre) Gecko/20070215 K-Ninja/2.1.1",
        "Mozilla/5.0 (Windows; U; Windows NT 5.1; zh-CN; rv:1.9) Gecko/20080705 Firefox/3.0 Kapiko/3.0",
        "Mozilla/5.0 (X11; Linux i686; U;) Gecko/20070322 Kazehakase/0.4.5"
    ]

    def process_request(self, request, spider):
        print("------下载中间件----")
        # 随机选择
        user_agent = random.choice(self.USER_AGENTS_LIST)
        request.headers['User-Agent'] = user_agent
return None中间件编写完成后记住需要在settings.py中启用。
翻页操作
使用xpath定位到翻页控件并获取当前控件的href属性,将这个属性值拼接到start_urls链接中,使用response响应对象中的response.urljoin方法完成地址拼接。
注意:当前案例写入的URL地址携带查询字符串,需要将原本的查询字符串去除。
import scrapy
from scrapy import cmdline
from scrapy.http import HtmlResponse


class Top250Spider(scrapy.Spider):
    name = "top250"

    # 图片域名与网站域名不一致
    allowed_domains = ["douban.com", "doubanio.com"]
    start_urls = ["https://movie.douban.com/top250"]

    def parse(self, response: HtmlResponse, **kwargs):
        # 查看请求头信息
        # print(response.request.headers)

        li_list = response.xpath("//ol[@class='grid_view']/li")
        for li_temp in li_list:
            image_url = li_temp.xpath(".//img/@src").extract_first()
            title = li_temp.xpath(".//span[@class='title'][1]/text()").extract_first()
            rating_num = li_temp.xpath(".//span[@class='rating_num']/text()").extract_first()
            people_num = li_temp.xpath(".//div[@class='star']/span[4]/text()").extract_first()

            # 信息验证
            # print('--->', image, title, rating_num, people_num)

            yield {
                'type': 'info',
                'image': image_url,
                'title': title,
                'rating_num': rating_num,
                'people_num': people_num
            }

            # 创建新的请求对象下载图片
            yield scrapy.Request(url=image_url, callback=self.parse_image, cb_kwargs={'image_name': title})

        # 获取下一页的链接, 最后一页停止运行
        if response.xpath("//span[@class='next']/a/@href"):
            next_url = response.urljoin(response.xpath("//span[@class='next']/a/@href").extract_first())
            print('开始抓取下一页: ', next_url)
            yield scrapy.Request(url=next_url, callback=self.parse)
        else:
            print('全站抓取完成...')

    def parse_image(self, response, image_name):
        yield {
            'type': 'image',
            'image_name': image_name + '.jpg',
            'image_content': response.body
        }


if __name__ == '__main__':
cmdline.execute('scrapy crawl top250'.split())除了可以使用url拼接查询字符串进行翻页之外,也可以自己手动构造翻页的请求对象,在Spider爬虫类中重写start_requests方法即可。
class Top250Spider(scrapy.Spider):
    def start_requests(self):
        for page in range(0, 10):
            url = 'https://movie.douban.com/top250?start={}&filter='.format(page * 25)
            print('当前页数:', url)
yield scrapy.Request(url)请求延时
在豆瓣爬虫案例中,我们已经完成了代码编写。但是,在翻页抓取时因为Scrapy框架的异步抓取可能会导致我们的爬虫被网站服务器封禁。所以,我们需要控制爬虫的请求频率。
在settings.py中设置请求频率:
# 在配置文件中搜索此配置开启即可
# 当前参数不会等待固定的3秒钟,而是使用当前设置的参数乘以0.5 - 1.5之间的等待时间(1.5秒到4.5秒之间)
DOWNLOAD_DELAY = 3作用:Scrapy爬取同一个域名下的间隔时间,不是固定时间。
详情可参考:https://www.osgeo.cn/scrapy/topics/settings.html?highlight=download_delay#std-setting-DOWNLOAD_DELAY
中间件代码示例 - 设置IP代理
在爬虫项目中虽然设置了请求延时,但是在某些情况下网站服务器依然会封禁我们的爬虫程序。此时就可以使用不同的IP地址来访问目标站点。
在Scrapy的Request对象当中包含meta元信息,可以使用meta参数设置代理。
在下载中间件中设置代理
# 免费代理ip
class FreeProxyDownloaderMiddleware:
    def process_request(self, request, spider):
        print('下载中间件 - 代理设置')
        # 当前设置免费代理
        request.meta['proxy'] = 'http://127.0.0.1:7890'
        return None  # 当前return可省略

    def process_response(self, request, response, spider):
        print('下载中间件 - 代理检测')
        if response.status != 200:
            request.dont_filter = True  # 关闭过滤, 并重新发送失败的请求
            return request
        return response  # 通过引擎交给爬虫处理或交给权重更低的其他下载中间件的process_response方法


# 付费代理ip
class TollProxyDownloaderMiddleware:
    """
    付费代理配置文档(快代理):
        https://www.kuaidaili.com/doc/dev/sdk_http/#proxy_python-scrapy
    """
pass代理中间件编写完成后记住在settings.py中开启。
在Scrapy中使用Selenium
在某些网站中的数据是通过ajax动态渲染的,不能直接通过Scrapy获取到页面渲染的数据。此时就可以通过之前学习的Selenium来获取动态数据。
接下来我们通过腾讯招聘爬虫案例来学习如何在Scrapy框架中集成Selenium,目标站点:https://careers.tencent.com/search.html
项目创建
scrapy startproject TxWork爬虫创建
cd TxWork
scrapy genspider tx_work_info https://careers.tencent.com/search.html下载中间件:
middlewares.py
import scrapy
from scrapy import signals
from selenium import webdriver
from selenium.webdriver.common.by import By
from selenium.webdriver.support.wait import WebDriverWait
from selenium.webdriver.support import expected_conditions as EC


class SeleniumDownloaderMiddleware:
    def __init__(self):
        self.browser = webdriver.Chrome()

    # 监测爬虫状态
    @classmethod
    def from_crawler(cls, crawler):
        s = cls()
        # 如果爬虫关闭则调用spider_closed方法
        crawler.signals.connect(s.spider_closed, signal=signals.spider_closed)
        return s

    def process_request(self, request, spider):
        self.browser.get(request.url)
        wait = WebDriverWait(self.browser, 10)
        wait.until(EC.presence_of_element_located(
            (By.CLASS_NAME, 'recruit-list')
        ))

        # 获取页面信息
        body = self.browser.page_source
        return scrapy.http.HtmlResponse(url=request.url, body=body, request=request, encoding='utf-8')

    def spider_closed(self):
        # self.browser.quit()
self.browser.close()爬虫文件:
tx_work_info.py在爬虫文件代码中,我们需要手动构造请求地址完成翻页功能,需要重写
Spider类中的start_requests方法。
import scrapy
from scrapy import cmdline
from scrapy.http import HtmlResponse


class TxWorkInfoSpider(scrapy.Spider):
    name = "tx_work_info"
    allowed_domains = ["careers.tencent.com"]
    # start_urls = ["https://careers.tencent.com/search.html"]

    # 手动构建请求地址
    def start_requests(self):
        url = 'https://careers.tencent.com/search.html?index={}&keyword=python'
        for page in range(1, 6):
            yield scrapy.Request(url=url.format(page))

    def parse(self, response: HtmlResponse, **kwargs):
        div_list = response.xpath("//div[@class='correlation-degree']/div/div")
        for div in div_list:
            item = dict()
            item['title'] = div.xpath('./a//span[@class="job-recruit-title"]/text()').extract_first()
            item['department'] = div.xpath('./a/p[1]/span[1]/text()').extract_first()
            item['address'] = div.xpath('./a//span[2]/text()').extract_first()
            item['post'] = div.xpath('./a/p[1]/span[3]/text()').extract_first()
            item['date'] = div.xpath('./a/p[1]/span[last()]/text()').extract_first()
            item['recruit_data'] = div.xpath('./a/p[2]/text()').extract_first()
            yield item

        # 当前方法无法对python岗位页面翻页,原因是首页岗位页数与python岗位页数不一致
        # if response.xpath("//li[last()-1]/span/text()"):
        #     page_num = response.xpath("//li[last()-1]/span/text()").extract_first()
        #     page_num = int(page_num) + 1
        #     for page in range(1, page_num):
        #         next_url = response.urljoin(f"?index={page}&keyword=python")
        #         print(next_url)
        #         yield scrapy.Request(url=next_url, callback=self.parse)


if __name__ == "__main__":
cmdline.execute('scrapy crawl tx_work_info'.split())管道文件:
pipelines.py
# Define your item pipelines here
#
# Don't forget to add your pipeline to the ITEM_PIPELINES setting
# See: https://docs.scrapy.org/en/latest/topics/item-pipeline.html


# useful for handling different item types with a single interface
import pymongo
from itemadapter import ItemAdapter


class TxworkPipeline:
    def process_item(self, item, spider):
        mongo_client = pymongo.MongoClient()
        collection = mongo_client['py_spider']['tx_work_info']
        collection.insert_one(item)
        print('数据插入成功: ', item.get('title'))
        # return item
settings.py配置
ROBOTSTXT_OBEY = False

DOWNLOADER_MIDDLEWARES = {
    # "TxWork.middlewares.TxworkDownloaderMiddleware": 543,
    "TxWork.middlewares.SeleniumDownloaderMiddleware": 543,
}

ITEM_PIPELINES = {
    "TxWork.pipelines.TxworkPipeline": 300,
}10.管道的详细使用
在前面学习Scrapy时,我们用过管道,它其实就是一个类,这个类中有process_item方法,在这个方法中,可以实现将数据存储到MongoDB中。
但问题来了:如果有一个Scrapy爬虫项目,它需要在存储数据之前,先进行清洗数据(所谓清洗就是去除不符合要求的数据),然后再存储数据。此时应该怎么办呢?
答:可以创建多个管道。
自定义管道
如果我们需要自定义管道pipeline,那么就要注意在管道类中可以编写的方法如下:
process_item(self, item, spider)
- 管道类中必须要有的方法
- 实现对
item数据的处理 - 一般情况下都会
return item,如果没有return,那么就相当于将None传递给权重低的process_item
open_spider(self, spider)
- 在爬虫开启的时候仅执行一次
- 可以在该方法中链接数据库、打开文件等等
close_spider(self, spider)
- 在爬虫关闭的时候仅执行一次
- 可以在该方法中关闭数据库连接、关闭文件对象等
代码示例
我们以之前的腾讯招聘爬虫为例,在当前项目中修改piplines.py文件:
# Define your item pipelines here
#
# Don't forget to add your pipeline to the ITEM_PIPELINES setting
# See: https://docs.scrapy.org/en/latest/topics/item-pipeline.html


# useful for handling different item types with a single interface
import json
import pymongo
from itemadapter import ItemAdapter


class TxWorkFilePipeline:
    def open_spider(self, spider):
        if spider.name == 'tx_work_info':
            self.file_obj = open('json.txt', 'a', encoding='utf-8')

    def process_item(self, item, spider):
        """
        在当前方法中可以对item进行数据判断,如果不符合数据要求,一般有两种方式来处理:
            1. 扔掉
                抛出一个异常中断当前管道,阻止item通过return传递给下一个管道
            2. 修复
                在当前方法中编辑修复代码逻辑并使用return将修复的数据传递给下一个item

            注意:
                当前方法如果存在return item则将item数据传递给下一个item
                如果return不存在则将None传递给下一个item
        """
        if spider.name == 'tx_work_info':
            self.file_obj.write(json.dumps(item, ensure_ascii=False, indent=4) + ',\n')
        return item

    def close_spider(self, spider):
        if spider.name == 'tx_work_info':
            self.file_obj.close()


class TxWorkMongoPipeline:
    def open_spider(self, spider):
        if spider.name == 'tx_work_info':
            self.mongo_client = pymongo.MongoClient()
            self.collection = self.mongo_client['py_spider']['tx_work_info']

    def process_item(self, item, spider):
        if spider.name == 'tx_work_info':
            self.collection.insert_one(item)
            print('数据插入成功: ', item.get('title'))
            return item

    def close_spider(self, spider):
        if spider.name == 'tx_work_info':
self.mongo_client.close()将修改完成后的pipline添加到settings.py配置文件中:
ITEM_PIPELINES = {
    "TxWork.pipelines.TxWorkFilePipeline": 300,
    "TxWork.pipelines.TxWorkMongoPipeline": 301,
}思考
在settings.py中能够开启多个管道,为什么需要开启多个?
- 不同的
pipeline可以处理不同爬虫的数据,通过spider.name属性来区分 - 不同的
pipeline能够对一个或多个爬虫进行不同的数据处理的操作,比如一个进行数据清洗,一个进行数据的保存 - 同一个管道类也可以处理不同爬虫的数据,通过
spider.name属性来区分
总结
- 使用之前需要在
settings.py中开启 - 多个管道在项目中的位置可以自定义,值表示距离引擎的远近,越近数据会越先经过:权重值小的优先执行
- 有多个
pipeline的时候,process_item方法应该return item,否则后一个pipeline取到的数据为None值 pipeline中process_item的方法必须有,否则item没有办法接收和处理process_item方法接受item和spider,其中spider表示当前传递item过来的spider引用open_spider(spider):能够在爬虫开启的时候执行一次close_spider(spider):能够在爬虫关闭的时候执行一次- 上述俩个方法经常用于爬虫和数据库的交互,在爬虫开启的时候建立数据库的连接,在爬虫关闭的时候断开数据库的连接
11.数据去重
在实际爬取某网站时,可能由于某些原因导致爬虫意外结束,当开发人员修复之后,需要在之前爬取的基础上继续爬取,此时就需要进行过滤掉已爬取的URL或者数据,完成数据去重操作。
- 可以判断
URL是否爬取过 - 可以判断数据是否存储过
对数据进行去重
import json
import redis
import hashlib
from scrapy.exceptions import DropItem


class TxWorkCheckPipeline:
    """
    使用redis进行数据去重
    """

    def open_spider(self, spider):
        if spider.name == 'tx_work_info':
            self.redis_client = redis.Redis()

    def process_item(self, item, spider):
        if spider.name == 'tx_work_info':
            # 将传递过来的item数据转为字符串并加密成md5数据
            item_str = json.dumps(item)
            md5_hash = hashlib.md5()
            md5_hash.update(item_str.encode())
            hash_value = md5_hash.hexdigest()

            # 判断hash值是否存在于redis中
            if self.redis_client.get(f'tx_work_item_filter:{hash_value}'):
                # 如果存在则抛出异常停止管道传递数据
                raise DropItem('数据已存在...')
            else:
                # 如果不存在则将hash保存到redis中
                # tx_work_filter:前缀会在redis中创建文件夹, 便于管理
                self.redis_client.set(f'tx_work_item_filter:{hash_value}', item_str)
            return item

    def close_spider(self, spider):
        if spider.name == 'tx_work_info':
self.redis_client.close()以上代码已经实现了对数据的去重,但是在项目启动时对之前已经访问过的URL地址还是会重复访问。所以接下来可以对之前访问过的URL进行去重。
对地址进行去重
import redis
import scrapy
import hashlib
from scrapy import cmdline
from scrapy.http import HtmlResponse


class TxWorkInfoSpider(scrapy.Spider):
    name = "tx_work_info"
    allowed_domains = ["careers.tencent.com"]

    # start_urls = ["https://careers.tencent.com/search.html"]
    def __init__(self, *args, **kwargs):
        super().__init__(*args, **kwargs)
        self.redis_client = redis.Redis()

    # 当程序退出时关闭redis连接
    def __del__(self):
        self.redis_client.close()

    # 手动构建请求地址
    def start_requests(self):
        url = 'https://careers.tencent.com/search.html?index={}&keyword=python'
        for page in range(1, 6):
            md5_hash = hashlib.md5()
            md5_hash.update(url.format(page).encode())
            hash_value = md5_hash.hexdigest()

            if self.redis_client.get(f'tx_work_url_filter:{hash_value}'):
                print('url重复...')
                continue
            else:
                self.redis_client.set(f'tx_work_url_filter:{hash_value}', url.format(page))
                yield scrapy.Request(url=url.format(page))

    def parse(self, response: HtmlResponse, **kwargs):
        div_list = response.xpath("//div[@class='correlation-degree']/div/div")
        for div in div_list:
            item = dict()
            item['title'] = div.xpath('./a//span[@class="job-recruit-title"]/text()').extract_first()
            item['department'] = div.xpath('./a/p[1]/span[1]/text()').extract_first()
            item['address'] = div.xpath('./a//span[2]/text()').extract_first()
            item['post'] = div.xpath('./a/p[1]/span[3]/text()').extract_first()
            item['date'] = div.xpath('./a/p[1]/span[last()]/text()').extract_first()
            item['recruit_data'] = div.xpath('./a/p[2]/text()').extract_first()
            yield item


if __name__ == "__main__":
cmdline.execute('scrapy crawl tx_work_info'.split())12.增量爬虫
有些情况下,我们希望能暂停爬虫,之后在恢复运行,尤其是抓取大型站点的时候可以完成暂停与恢复。此时就用到了Scrapy的爬虫暂停与爬虫恢复。
暂停爬虫的命令
想要实现暂停,Scrapy代码不用修改,只需要在启动时修改运行命令即可:
# scrapy crawl 爬虫名称 -s JOBDIR=缓存scrapy信息的路径

scrapy crawl MySpider -s JOBDIR=crawls/my_spider-1暂停爬虫的快捷键
在终端启动爬虫之后,只需要按下ctrl + c就可以让爬虫暂停
注意点:ctrl + c不能执行两次,只需一次即可
恢复爬虫的命令
与暂停爬虫的指令类似,恢复爬虫时运行相同的命令:
# scrapy crawl 爬虫名称 -s JOBDIR=缓存scrapy信息的路径

scrapy crawl MySpider -s JOBDIR=crawls/my_spider-113.dont_filter参数与start_requests方法
dont_filter参数
当我们在使用scrapy生成一个新的Request请求对象时,需要根据业务场景判断是否请求重复的Request对象,如果不需要重复请求则通过dont_filter进行过滤。
scrapy.Request初始化方法部分源码:
def __init__(
        self,
        url: str,
        callback: Optional[Callable] = None,
        method: str = "GET",
        headers: Optional[dict] = None,
        body: Optional[Union[bytes, str]] = None,
        cookies: Optional[Union[dict, List[dict]]] = None,
        meta: Optional[dict] = None,
        encoding: str = "utf-8",
        priority: int = 0,
        dont_filter: bool = False,
        errback: Optional[Callable] = None,
        flags: Optional[List[str]] = None,
        cb_kwargs: Optional[dict] = None,
    ) -> None:
...通过以上代码我们得知dont_filter参数的默认值为False,即默认开启重复请求过滤。如果需要对重复的Request对象发起请求则设置dont_filter参数值为True。
start_requests方法
start_requests是scrapy.Spider父类中的方法,在没有重写的情况下,Scrapy提取start_urls列表中的地址并构建请求对象。
但是如果在重写的情况下,则调用重写后的代码而不经过start_urls,只要保证这个方法的返回值可以迭代即可。
如何确定在什么场景下需要重写start_requests方法?
- 如果
start_urls列表中的地址需要登录后才能访问,则需要重写start_requests方法并手动添加cookie - 需要自己构建翻页地址的情况下可以重写
start_requests方法 - 如果在
start_urls中的URL需要用POST提交的话,则需要在start_requests方法中修改 - 默认情况下
start_urls中的URL在被生成Request对象时,都是设置为不过滤,即dont_filter=True,所以如果想使用暂停、恢复爬取功能的话,就需要重写此方法了。
再次理解豆瓣爬虫代码
import scrapy
from scrapy import cmdline
from scrapy.http import HtmlResponse


class Top250Spider(scrapy.Spider):
    name = "top250"
    allowed_domains = ["douban.com", "doubanio.com"]

    """
    start_urls中的地址默认是不过滤的
    	所以需要对列表中的地址过滤则重写start_requests

    	详情可查看父类中的start_requests方法
    """
    start_urls = ["https://movie.douban.com/top250"]

    def parse(self, response: HtmlResponse, **kwargs):
        li_list = response.xpath("//ol[@class='grid_view']/li")
        for li_temp in li_list:
            image_url = li_temp.xpath(".//img/@src").extract_first()
            title = li_temp.xpath(".//span[@class='title'][1]/text()").extract_first()
            rating_num = li_temp.xpath(".//span[@class='rating_num']/text()").extract_first()
            people_num = li_temp.xpath(".//div[@class='star']/span[4]/text()").extract_first()

            yield {
                'type': 'info',
                'image': image_url,
                'title': title,
                'rating_num': rating_num,
                'people_num': people_num
            }

            # 创建新的请求对象下载图片
            # 自己生成的新的Request对象Scrapy默认是过滤的
            yield scrapy.Request(url=image_url, callback=self.parse_image, cb_kwargs={'image_name': title})

        if response.xpath("//span[@class='next']/a/@href"):
            next_url = response.urljoin(response.xpath("//span[@class='next']/a/@href").extract_first())
            print('开始抓取下一页: ', next_url)
            yield scrapy.Request(url=next_url, callback=self.parse)
        else:
            print('全站抓取完成...')

    def parse_image(self, response, image_name):
        yield {
            'type': 'image',
            'image_name': image_name + '.jpg',
            'image_content': response.body
        }


"""
if __name__ == '__main__':
    cmdline.execute('scrapy crawl top250 -s JOBDIR=crawls/my_spider-1'.split())
"""修改豆瓣爬虫代码让其支持地址过滤
重写
start_requests方法即可
import scrapy
from scrapy import cmdline
from scrapy.http import HtmlResponse


class Top250Spider(scrapy.Spider):
    name = "top250"
    allowed_domains = ["douban.com", "doubanio.com"]
    start_urls = ["https://movie.douban.com/top250"]

    def start_requests(self):
        for url in self.start_urls:
            # 重新构造请求对象, dont_filter=False可不写
            yield scrapy.Request(url=url, callback=self.parse, dont_filter=False)

    def parse(self, response: HtmlResponse, **kwargs):
        li_list = response.xpath("//ol[@class='grid_view']/li")
        for li_temp in li_list:
            image_url = li_temp.xpath(".//img/@src").extract_first()
            title = li_temp.xpath(".//span[@class='title'][1]/text()").extract_first()
            rating_num = li_temp.xpath(".//span[@class='rating_num']/text()").extract_first()
            people_num = li_temp.xpath(".//div[@class='star']/span[4]/text()").extract_first()

            yield {
                'type': 'info',
                'image': image_url,
                'title': title,
                'rating_num': rating_num,
                'people_num': people_num
            }

            yield scrapy.Request(url=image_url, callback=self.parse_image, cb_kwargs={'image_name': title})

        if response.xpath("//span[@class='next']/a/@href"):
            next_url = response.urljoin(response.xpath("//span[@class='next']/a/@href").extract_first())
            print('开始抓取下一页: ', next_url)
            yield scrapy.Request(url=next_url, callback=self.parse)
        else:
            print('全站抓取完成...')

    def parse_image(self, response, image_name):
        yield {
            'type': 'image',
            'image_name': image_name + '.jpg',
            'image_content': response.body
        }


"""
if __name__ == '__main__':
    cmdline.execute('scrapy crawl top250 -s JOBDIR=crawls/my_spider-1'.split())
"""14.发送POST请求
在之前的学习当中我们经常会使用Scrapy发送GET请求,那么如果一些网站接收的请求类型为POST应该怎么处理?
接下来我们以巨潮资讯网为例,讲解如何发送POST请求。
目标站点:http://www.cninfo.com.cn/new/commonUrl?url=disclosure/list/notice#szse
代码示例
爬虫文件
# import json
import scrapy
from scrapy import cmdline
from HcInfo.items import HcInfoItem


class HcInfoDataSpider(scrapy.Spider):
    name = "HcInfoData"

    def start_requests(self):
        url = 'http://www.cninfo.com.cn/new/disclosure'

        # 表单数据
        for page in range(1, 16):
            data = {
                'column': 'szse_latest',
                'pageNum': str(page),
                'pageSize': '30',
                'sortName': '',
                'sortType': '',
                'clusterFlag': 'true',
            }

            yield scrapy.FormRequest(url=url, formdata=data, callback=self.parse, dont_filter=False)
            # yield scrapy.Request(url=url, body=json.dumps(data), method='POST', callback=self.parse)

    def parse(self, response, **kwargs):
        for info_list in response.json()['classifiedAnnouncements']:
            for info in info_list:
                item = HcInfoItem()
                item['announcementTitle'] = info['announcementTitle']
                item['announcementTypeName'] = info['announcementTypeName']
                item['batchNum'] = info['batchNum']
                item['secName'] = info['secName']
                item['adjunctType'] = info['adjunctType']
                yield item


if __name__ == '__main__':
    cmdline.execute('scrapy crawl HcInfoData'.split())
items.py文件
首先需要了解items.py文件可以定义抓取的数据结构,在校验完数据结构之后则可以递交给管道进行数据存储。总之,items.py主要功能是检查抓取的数据是否符合自己定义的数据结构。
# Define here the models for your scraped items
#
# See documentation in:
# https://docs.scrapy.org/en/latest/topics/items.html

import scrapy


class HcInfoItem(scrapy.Item):
    # define the fields for your item here like:
    # name = scrapy.Field()
    announcementTitle = scrapy.Field()
    announcementTypeName = scrapy.Field()
    batchNum = scrapy.Field()
    secName = scrapy.Field()
adjunctType = scrapy.Field()管道文件
# Define your item pipelines here
#
# Don't forget to add your pipeline to the ITEM_PIPELINES setting
# See: https://docs.scrapy.org/en/latest/topics/item-pipeline.html


# useful for handling different item types with a single interface
import pymongo
from itemadapter import ItemAdapter


class HcInfoPipeline:
    def process_item(self, item, spider):
        return item


class MongoPipeline:
    def open_spider(self, spider):
        if spider.name == 'HcInfoData':
            self.mongo_client = pymongo.MongoClient()
            self.collection = self.mongo_client['py_spider']['jc_info']

    def process_item(self, item, spider):
        if spider.name == 'HcInfoData':
            self.collection.insert_one(dict(item))
        return item

    def close_spider(self, spider):
        if spider.name == 'HcInfoData':
            self.mongo_client.close()
